第1章 持续代码质量管理-Sonar部署
Sonar 是一个用于代码质量管理的开放平台。通过插件机制,Sonar 可以集成不同的测试工具,代码分析工具,以及持续集成工具。与持续集成工具(例如 Hudson/Jenkins 等)不同,Sonar 并不是简单地把不同的代码检查工具结果(例如 FindBugs,PMD 等)直接显示在 Web 页面上,而是通过不同的插件对这些结果进行再加工处理,通过量化的方式度量代码质量的变化,从而可以方便地对不同规模和种类的工程进行代码质量管理。
在对其他工具的支持方面,Sonar 不仅提供了对 IDE 的支持,可以在 Eclipse 和 IntelliJ IDEA 这些工具里联机查看结果;同时 Sonar 还对大量的持续集成工具提供了接口支持,可以很方便地在持续集成中使用 Sonar。
此外,Sonar 的插件还可以对 Java 以外的其他编程语言提供支持,对国际化以及报告文档化也有良好的支持。
Sonar部署
Sonar的相关下载和文档可以在下面的链接中找到:http://www.sonarqube.org/downloads/。需要注意最新版的Sonar需要至少JDK 1.8及以上版本。
1.1 查看版本号:
[root@jenkins auto-deploy]# java -version
java version "1.8.0_60"
Java(TM) SE Runtime Environment (build 1.8.0_60-b27)
Java HotSpot(TM) 64-Bit Server VM (build 25.60-b23, mixed mode)
4.2 sonar 下载路径
https://www.sonarqube.org/downloads/
#本次采用 6.4版本
#下载建议用迅雷或其它下载wget 有点慢
[root@jenkins tools]# wget https://sonarsource.bintray.com/Distribution/sonarqube/sonarqube-6.4.zip
#解压:
[root@jenkins tools]# unzip sonarqube-6.4.zip
#移动软连接
[root@jenkins tools]# mv sonarqube-6.4 /usr/local/
[root@jenkins tools]# ln -s /usr/local/sonarqube-6.4/ /usr/local/sonarqube
4.3 准备数据库
注意:sonar好像不支持mysql 5.5,所以如果看日志出现以上error 请安装mysql5.6 或者更高版本
#进入数据库
[root@jenkins tools]# mysql
Welcome to the MySQL monitor.  Commands end with ; or \g.
Your MySQL connection id is 2
Server version: 5.1.73 Source distribution

Copyright (c) 2000, 2013, Oracle and/or its affiliates. All rights reserved.

Oracle is a registered trademark of Oracle Corporation and/or its
affiliates. Other names may be trademarks of their respective
owners.

Type 'help;' or '\h' for help. Type '\c' to clear the current input statement.

mysql>
#创建库授权
mysql> CREATE DATABASE sonar CHARACTER SET utf8 COLLATE utf8_general_ci;
Query OK, 1 row affected (0.00 sec)

mysql> GRANT ALL ON sonar.* TO 'sonar'@'localhost' IDENTIFIED BY 'sonar@pw';
Query OK, 0 rows affected (0.00 sec)

mysql> GRANT ALL ON sonar.* TO 'sonar'@'%' IDENTIFIED BY 'sonar@pw';
Query OK, 0 rows affected (0.00 sec)

mysql>  FLUSH PRIVILEGES;
Query OK, 0 rows affected (0.00 sec)
4.4 配置Sonar
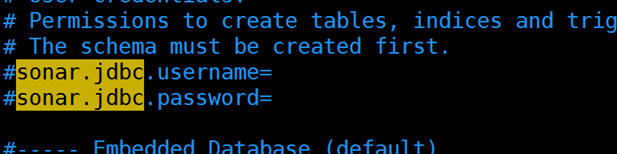
# The schema must be created first.
#填写用户和密码
sonar.jdbc.username=sonar
sonar.jdbc.password=sonar@pw
#----- Embedded Database (default)
# H2 embedded database server listening port, defaults to 9092
#sonar.embeddedDatabase.port=9092
#----- MySQL 5.6 or greater
# Only InnoDB storage engine is supported (not myISAM).
# Only the bundled driver is supported. It can not be changed.
<span style="color: #ff0000;">#注意:这块是使用mysql去掉#就行,其它不要复制(复制可能造成sonar无法启动)
sonar.jdbc.url=jdbc:mysql://localhost:3306/sonar?useUnicode=true&characterEncoding=utf8&rewriteBatchedStatements=true&useConfigs=maxPerformance&useSSL=false
配置Java访问数据库驱动(可选)
    默认情况Sonar有自带的嵌入的数据库,那么你如果使用类是Oracle数据库,必须手动复制驱动类到${SONAR_HOME}/extensions/jdbc-driver/oracle/目录下,其它支持的数据库默认提供了驱动。其它数据库的配置可以参考官方文档:
http://docs.sonarqube.org/display/HOME/SonarQube+Platform
启动Sonar
    你可以在Sonar的配置文件来配置Sonar Web监听的IP地址和端口,默认是9000端口</span>。

启动
[root@jenkins conf]# /usr/local/sonarqube/bin/linux-x86-64/sonar.sh start
Starting SonarQube...
Started SonarQube.
#查看端口
[root@jenkins conf]# netstat -lntup

#查看sonar进程
[root@jenkins conf]# ps -ef|grep sonar
root      10706   5640  0 21:49 pts/2    00:00:00 vim sonar.properties
root      12378   3869  0 21:55 pts/0    00:00:00 grep sonar
1.1 web 访问
http://IP:9000

1.1 登录
1.1 默认用户密码 admin admin

1.1 SonarQube 中文插件
SonarQube默认为英文,我们可以安装SonarQube提供提供了中文插件,以便更好地熟悉使用。
github地址:
https://github.com/SonarQubeCommunity/sonar-l10n-zh/releases
参照说明,对应的SonarQube版本下载对应的兼容插件即可。
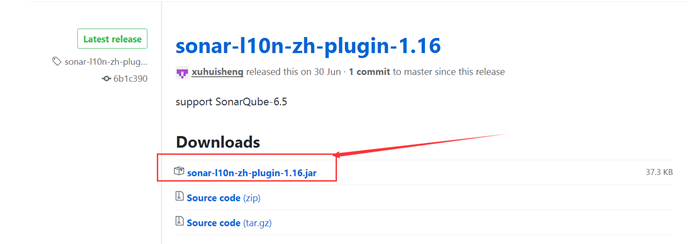
下载后,放入sonar目录如下(具体根据自己安装目录而定)
[root@jenkins plugins]# /usr/local/sonarqube/extensions/plugins
重启生效
[root@jenkins plugins]# /usr/local/sonarqube/bin/linux-x86-64/sonar.sh restart
重启后登录查看,中文了。

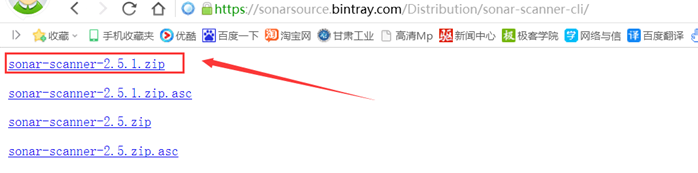
1.1 安装 SonarQube Scanner
Sonar通过SonarQube Scanner(扫描器)来对代码进行分析
备注:
https://sonarsource.bintray.com/Distribution/sonar-scanner-cli/
[root@jenkins plugins]# cd /home/yunwei/tools/
#进入下载目录(这块自定义)
[root@jenkins plugins]# cd /home/yunwei/tools/
#wget 下载
[root@jenkins tools]# wget https://sonarsource.bintray.com/Distribution/sonar-scanner-cli/sonar-scanner-2.5.1.zip
#查看
[root@jenkins tools]# ls
apache-maven-3.5.0-bin.tar.gz  jdk-8u60-linux-x64.tar.gz                  sonarqube-6.4.zip
apache-tomcat-8.0.27.tar.gz    mysql-5.6.34-linux-glibc2.5-x86_64.tar.gz  sonar-scanner-2.5.1.zip
java-1-8.sh                    sonarqube-6.4
                          web-demo
#解压
[root@jenkins tools]# unzip sonar-scanner-2.5.1.zip
Archive:  sonar-scanner-2.5.1.zip
   creating: sonar-scanner-2.5.1/bin/
   creating: sonar-scanner-2.5.1/conf/
  inflating: sonar-scanner-2.5.1/conf/sonar-runner.properties
   creating: sonar-scanner-2.5.1/lib/
  inflating: sonar-scanner-2.5.1/lib/sonar-scanner-cli-2.5.1.jar
  inflating: sonar-scanner-2.5.1/bin/sonar-runner.bat
  inflating: sonar-scanner-2.5.1/bin/sonar-runner
#移动、创建软连接
[root@jenkins tools]# mv sonar-scanner-2.5.1 /usr/local/
[root@jenkins tools]# ln -s /usr/local/sonar-scanner-2.5.1/ /usr/local/sonar-scanner
[root@jenkins tools]# cd /usr/local/sonar-scanner
[root@jenkins sonar-scanner]# ls
bin  conf  lib
下载一个 软件包
https://github.com/SonarSource/sonar-examples/releases
下载路径
https://github.com/SonarSource/sonar-examples/releases
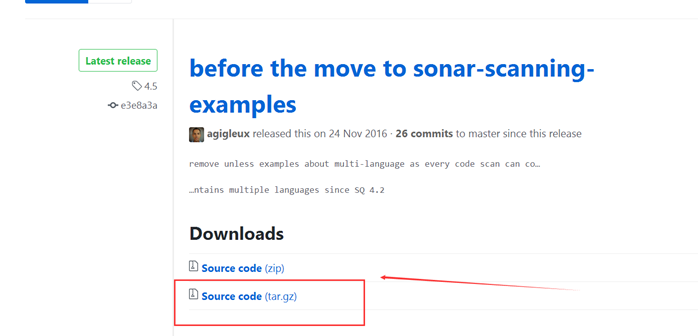
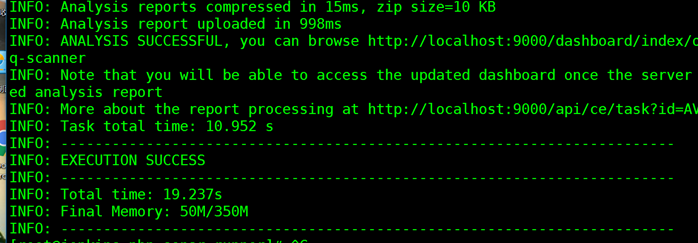
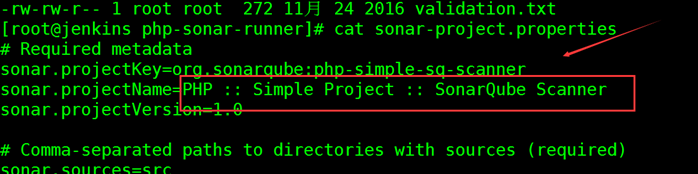
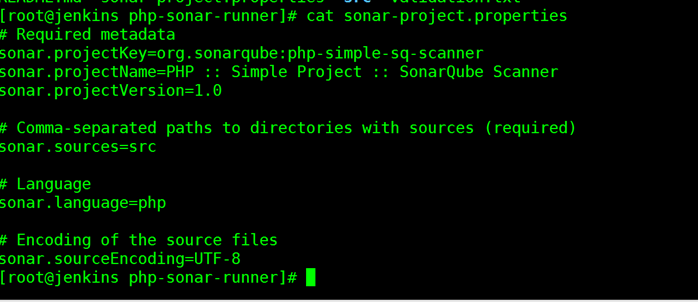
#找到一个目录将sonar-examples 包上传
[root@jenkins tools]# tar xf sonar-examples-4.5.tar.gz
#解压
[root@jenkins tools]# cd sonar-examples-4.5
#目录结构
[root@jenkins sonar-examples-4.5]# ls
plugins  projects  README.md
#进入项目语言
[root@jenkins sonar-examples-4.5]# cd projects/languages/
#查看大多数语言都有
[root@jenkins languages]# ls
abap     c      cpp     css     flex              groovy  javascript  php  plsql   rpg    vb6    web
android  cobol  csharp  erlang  generic-coverage  java    objc        pli  python  swift  vbnet  xml
#选择php因为 我们安装了PHP
root@jenkins languages]# cd php/
[root@jenkins php]# ls
php-sonar-runner  php-sonar-runner-unit-tests
[root@jenkins php]# ls -l
总用量 8
drwxrwxr-x 3 root root 4096 11月 24 2016 php-sonar-runner
drwxrwxr-x 5 root root 4096 11月 24 2016 php-sonar-runner-unit-tests
[root@jenkins php]# cd php-sonar-runner
[root@jenkins php-sonar-runner]# ls -l
总用量 16
-rw-rw-r-- 1 root root  453 11月 24 2016 README.md
-rw-rw-r-- 1 root root  331 11月 24 2016 sonar-project.properties
drwxrwxr-x 2 root root 4096 11月 24 2016 src
-rw-rw-r-- 1 root root  272 11月 24 2016 validation.txt
#项目必须要有配置文件你要使用扫描(如果没有无法执行)
[root@jenkins php-sonar-runner]# cat sonar-project.properties
# Required metadata
sonar.projectKey=org.sonarqube:php-simple-sq-scanner
sonar.projectName=PHP :: Simple Project :: SonarQube Scanner #项目名称
sonar.projectVersion=1.0 #版本

# Comma-separated paths to directories with sources (required)
sonar.sources=src #包放在哪里

# Language
sonar.language=php #语言是什么

# Encoding of the source files
sonar.sourceEncoding=UTF-8 #字符集
使用sonar-scanner 在当前目录执行扫描
[root@jenkins php-sonar-runner]# /usr/local/sonar-scanner/bin/sonar-runner
#扫描结束
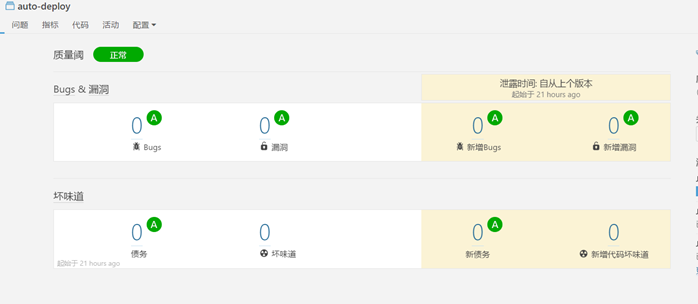
查看Sonar web 界面选择项目
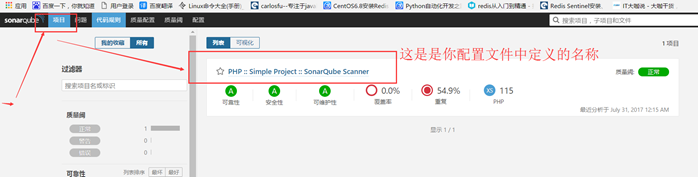
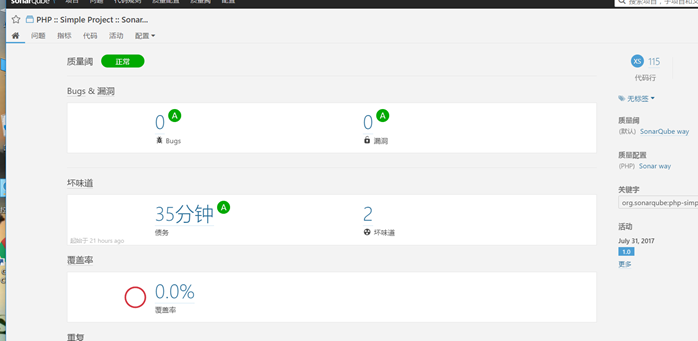
进入后可以点击查看详细的介绍(sonar 会根据自己定义查看你的代码有什么错误,详细如下。)

如果要sonar-scanner 和 jenkins 结合起来 配置文件怎么办?
第一种方式:在项目里配置
第二种方法:现输入。
第1章 jenkins 和 sonar
如果 需要jenkins 和 sonar 一起用,第一个是安装插件
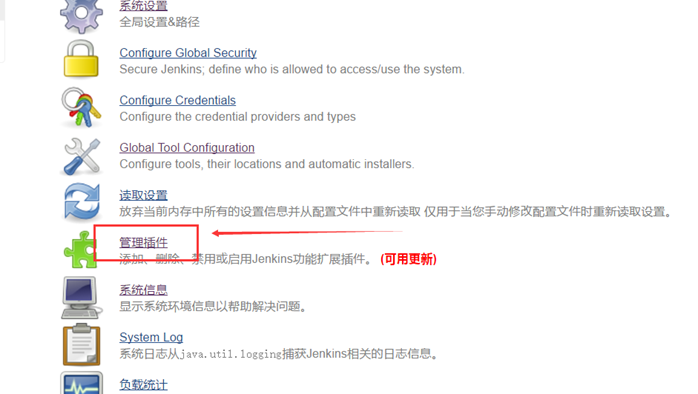
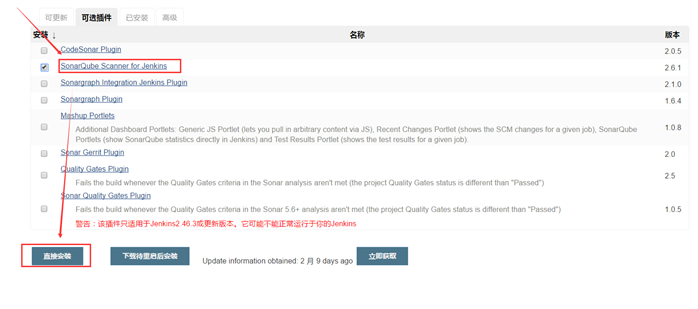
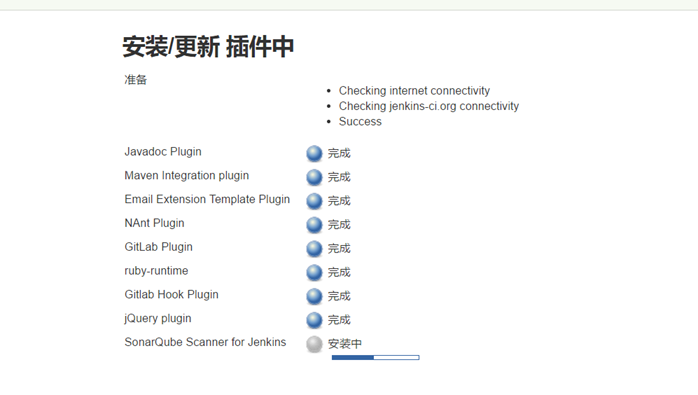
在jenkins 构建中打开 sonar
返回首页选择系统设置

点击 Add SonarQube 打开

选择保存就可以
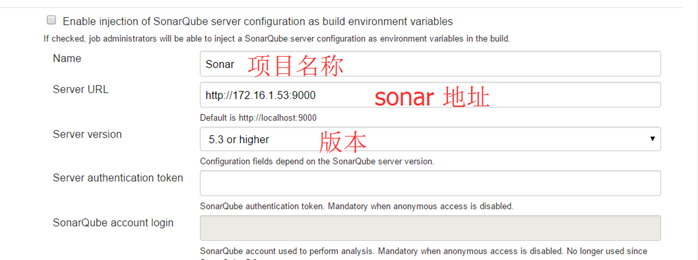
选择系统管理—全局配置
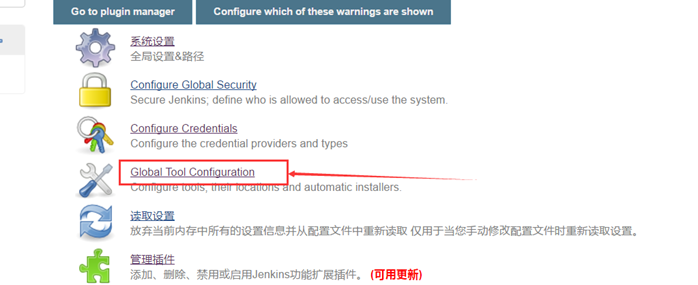

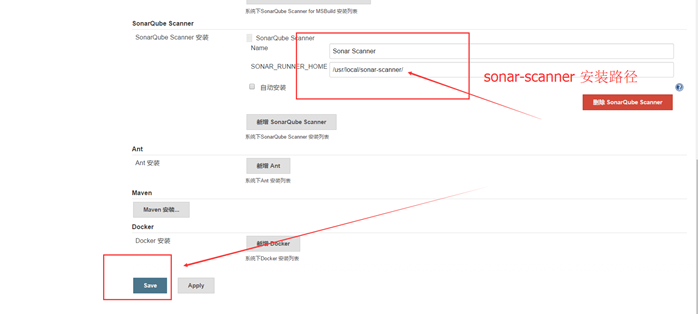
点击新增后SonarQube Scanner 名称自定义 取消自动安装(因为我们手动安装了)

#备注: sonar-scanner 和 Jenkins 尽量安装一台主机不然修改配置文件。
#将配置文件中localhost 改为 主机IP 即可。
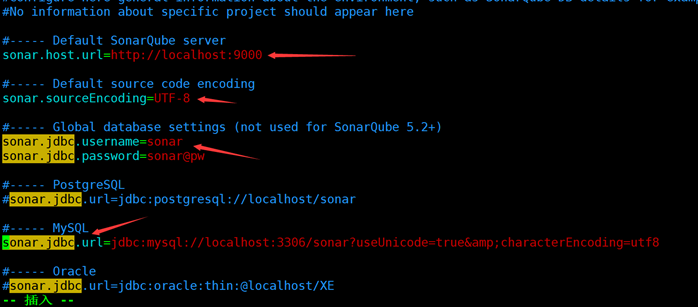
[root@jenkins conf]# pwd
/usr/local/sonar-scanner/conf
[root@jenkins conf]# ls
sonar-runner.properties
[root@jenkins conf]# cat sonar-runner.properties
#Configure here general information about the environment, such as SonarQube DB details for example
#No information about specific project should appear here

#----- Default SonarQube server
sonar.host.url=http://localhost:9000

#----- Default source code encoding
sonar.sourceEncoding=UTF-8

#----- Global database settings (not used for SonarQube 5.2+)
sonar.jdbc.username=sonar
sonar.jdbc.password=sonar@pw

#----- PostgreSQL
#sonar.jdbc.url=jdbc:postgresql://localhost/sonar

#----- MySQL
sonar.jdbc.url=jdbc:mysql://localhost:3306/sonar?useUnicode=true&characterEncoding=utf8

#----- Oracle
#sonar.jdbc.url=jdbc:oracle:thin:@localhost/XE

#----- Microsoft SQLServer
#sonar.jdbc.url=jdbc:jtds:sqlserver://localhost/sonar;SelectMethod=Cursor
填写sonar-scanner 配置路径保存
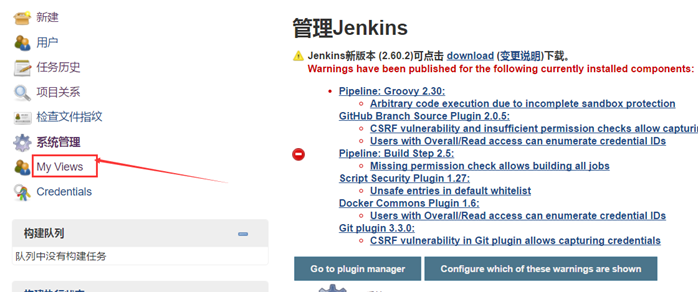
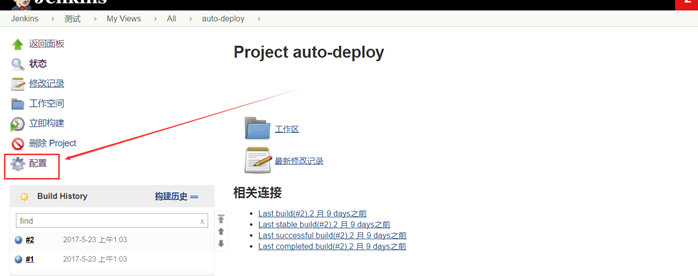
选择 My Views
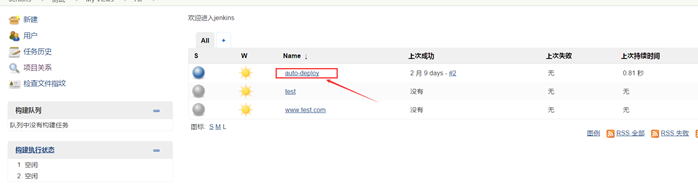
点击配置
目前只是做了源码管理,没有构建
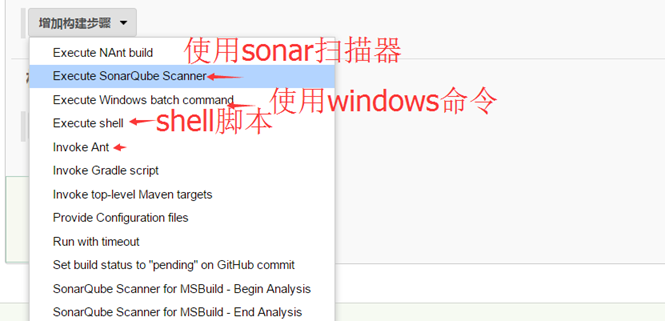
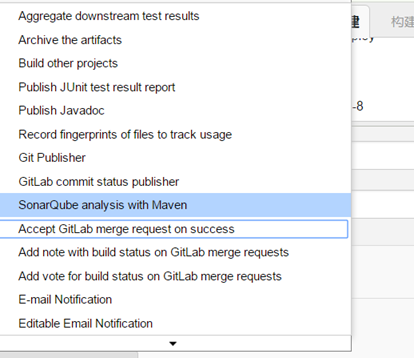
(选择Execte SonarQube Scanner)在Analysis proerties 中填写 sonar-project.properties 的文件
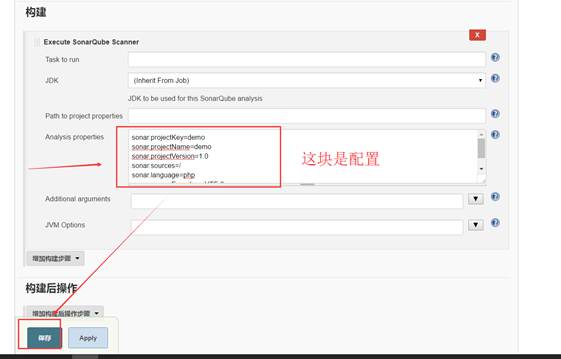
Analysis properties填写的是配置文件如下图
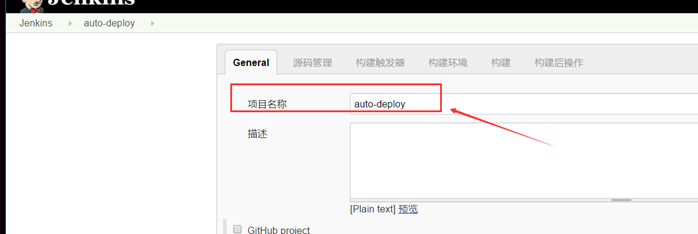
#具体填写中我们去掉了#号
sonar.projectKey=auto-deploy    #项目名称 一定要看清楚
sonar.projectName=auto-deploy    #项目名称
sonar.projectVersion=1.0  #版本
sonar.sources=/root/.jenkins/workspace/auto-deploy         #位置 这块根据自己而定
sonar.language=php        #语言
sonar.sourceEncoding=UTF-8  #字符集
#不带备注的
sonar.projectKey=auto-deploy
sonar.projectName=auto-deploy
sonar.projectVersion=1.0
sonar.sources=/root/.jenkins/workspace/auto-deploy
sonar.language=php
sonar.sourceEncoding=UTF-8
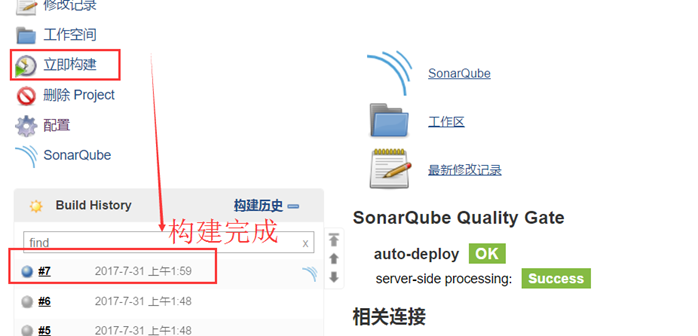
构建完成后查看

#注意:
#构建过程中失败了几次,原因如下sonar.projectKey=auto-deploy sonar.projectName=auto-deploy 这两个项目名字一样要根据自己的而定
在Jenkins 查看项目名称
sonar.sources=/root/.jenkins/workspace/auto-deploy 我写的是全路径/也可以写/root/
不建议写/ 哦,亲自试验过,最好写在你Jenkins 安装的目录路径。
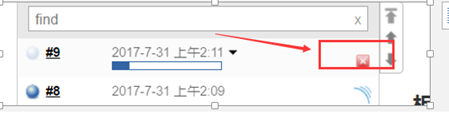
一定要写对,报错了或者的等待时间长,直接点击红叉结束、正确的如上图gitlab 拉完代码后、扫描,如果项目多可能慢点。
1.1 SonarQube 的快捷方式

进入后详细
Sonar
1.1 Jenkins构建后操作

具体根据业务而定
代码流水线、执行多个JOB
第1章 Jenkins 和 Job关联
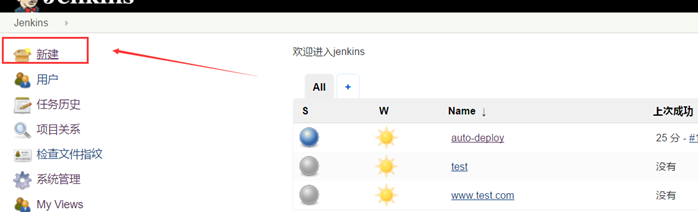
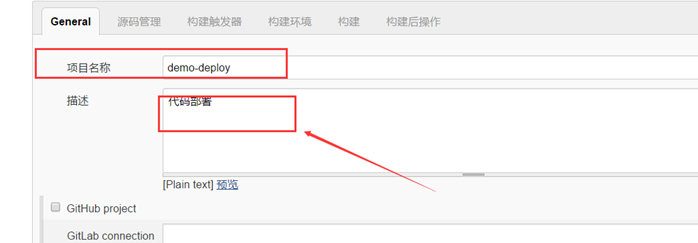
新建一个Job
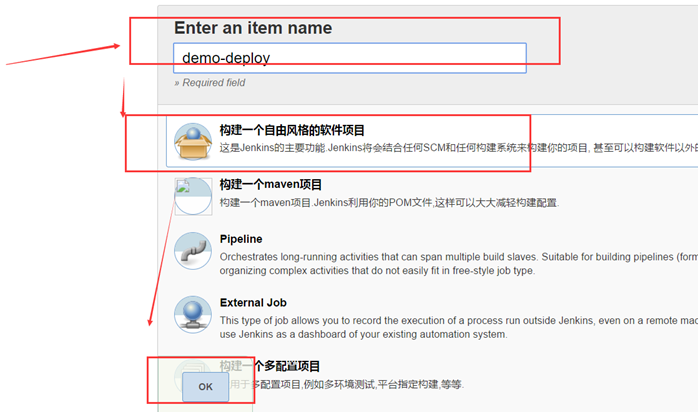
因为现在代码已经测试完成,需要提交测试环境测试
Enter an item name 名称demo-deploy
选择构建一个自由风格的软件项目
最后点击OK
填写备注
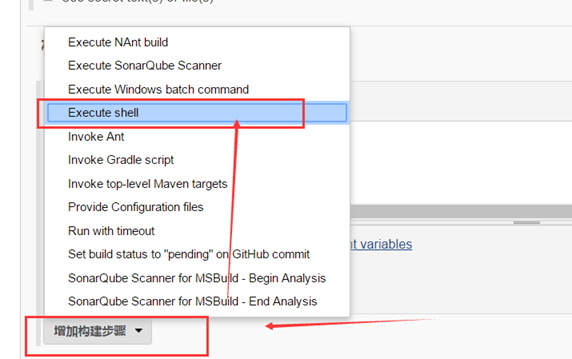
选择底下的构建步骤选择Execute-shll ()
主要问题:权限问题,清楚jenkins 用什么权限执行。
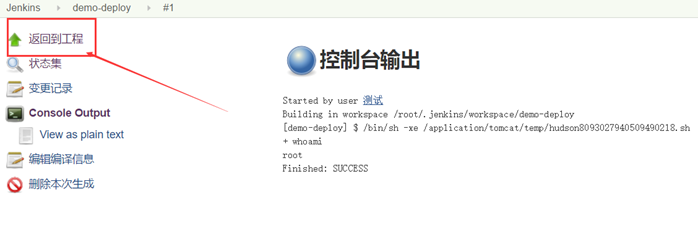
输入whoami 测试
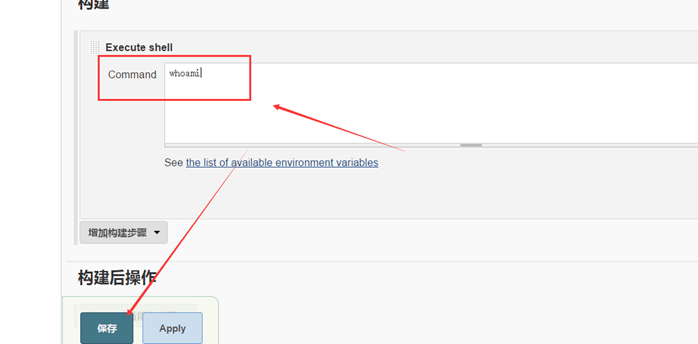
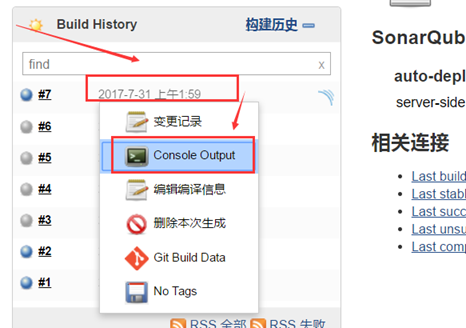
保存后选择立即构建
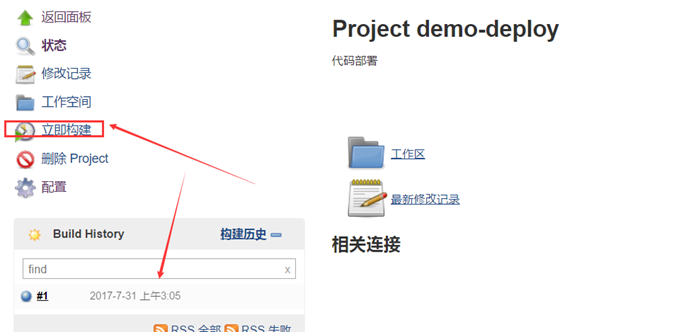
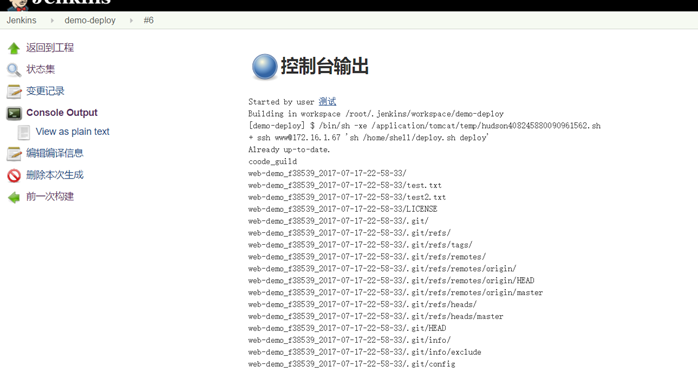
选择构建完成的、点击选择Console Output
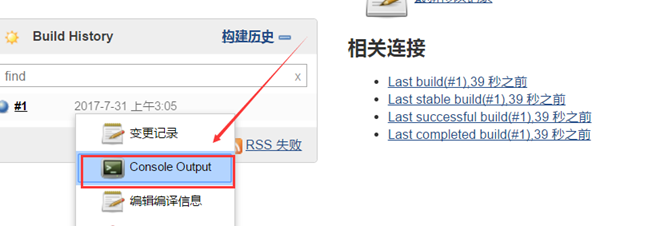
查看控制台输出为 ROOT 用户。

但是生产部署机和jenkins不在一个机器并且用户不一样。详细操作如下:
我web 自动化部署节点:172.16.1.67 用户www
jenkins :172.16.1.53
步骤如下。
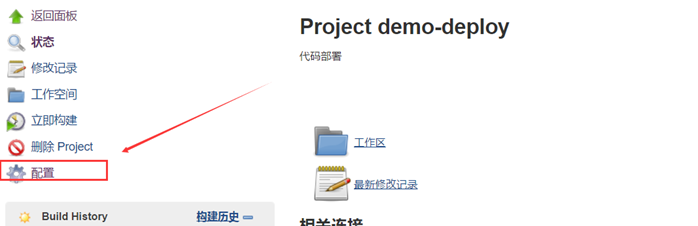
先返回工程并配置
做之前弄认证:
做jenkins 用户认证 (没有用户)
1.1 用root用户认证
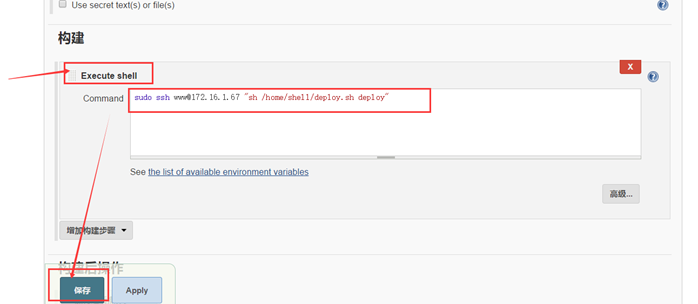
Jenkins 的 root 公钥复制到 web 项目主机中(172.16.1.65)
#查看Jenkins 的root 公钥
[root@jenkins .ssh]# ls
id_rsa  id_rsa.pub  known_hosts
[root@jenkins .ssh]# cat id_rsa.pub
ssh-rsa AAAAB3NzaC1yc2EAAAABIwAAAQEA1AuQ/8w421a5+TerB8Mw7o0xCar218p3g927DMpul8tJfJdX1WXQiy/jCY19qY00fL4j6c6kRMtXBZWjrZildNyiUL5DRGpmwDpY3Vycrt4QG6Y73MXZmw7qSWL1cSsX7BSOlHikb5p+7ioIcgI0ViNVbmRAyCISrkT6E17nSl/vVDps5BUBfKjRymDcVvgHH4IDgTH9XuFPjbh5Vs9rksImDqRRYjkPCsKs+GqaQDwsyLq4dLyplZahFbi7fdnenQOj2PFWRQyhTrfXpLuIbUSQuxBXd/vLPu2wls2FL729N0yO202jOp1/r+zXDoglbLF4Wo/fYXTGFBYMNnho8w== root@jenkins
#web 项目主机是www 用户
[www@node1 ~]$ cat /home/www/.ssh/authorized_keys
ssh-rsa AAAAB3NzaC1yc2EAAAABIwAAAQEA3tW5IOx9zlFpCDOakDXfpxuqen0v5GCTqe8u+iM9I8OuGzUVqs6uL5+cCy1MSsZ1fsTU6VhNaGYHk8XgXMODHeu3gMOI9beM3Zw6LeM78l+rMAdpV8m7mRuAgnZWjeuJ7uq2GSXATdSoNLETvgpuAlJlz4+crrLl8+7f/Wo+i5xjqmsm1Gq+vDRv5WahoWigMTHzbApRR7IIJBNQDePDwgd39/qWucEvnNofu9Qi3LfjNwllk6huPYcIkyUFiaYrLpU8EoN2HV4+dBnb6Qen0fuggngZDMqB3foL8ch6HY/MFULccwT5bIPy8wscnsdQ0ZBxhWX8+4Pc/O0oxG+7Jw== www@node3
#将Jenkins 的公钥放到此处。
ssh-rsa AAAAB3NzaC1yc2EAAAABIwAAAQEA1AuQ/8w421a5+TerB8Mw7o0xCar218p3g927DMpul8tJfJdX1WXQiy/jCY19qY00fL4j6c6kRMtXBZWjrZildNyiUL5DRGpmwDpY3Vycrt4QG6Y73MXZmw7qSWL1cSsX7BSOlHikb5p+7ioIcgI0ViNVbmRAyCISrkT6E17nSl/vVDps5BUBfKjRymDcVvgHH4IDgTH9XuFPjbh5Vs9rksImDqRRYjkPCsKs+GqaQDwsyLq4dLyplZahFbi7fdnenQOj2PFWRQyhTrfXpLuIbUSQuxBXd/vLPu2wls2FL729N0yO202jO1/r+zXDoglbLF4Wo/fYXTGFBYMNnho8w== root@jenkins
#从jenkins主机中ssh连接认证 web 主机
#第一次是没有将jenkins 公钥 同步web 主机连接需要密码
[root@jenkins .ssh]# ssh www@172.16.1.67
The authenticity of host '172.16.1.67 (172.16.1.67)' can't be established.
RSA key fingerprint is ed:9d:13:60:05:21:c6:2e:f4:48:1b:9a:ce:87:c2:a7.
Are you sure you want to continue connecting (yes/no)?
#第二次是将jenkins 公钥 同步web 主机 (连接上)
[root@jenkins ~]# ssh www@172.16.1.67
Last login: Mon Jul 17 21:40:39 2017 from 172.16.1.53
[www@node1 ~]$ exit
#再次在项目配置,选择Execute shell 中书写命令记得,因为Jenkins没有权限 使用sudo提权
#
[root@jenkins ~]# vim /etc/sudoers
root    ALL=(ALL)       ALL
jenkins ALL=(ALL)       NOPASSWD: /usr/bin/ssh
#备注其中只是授权 ssh 注意是全路径which 查询
[root@jenkins ~]# which ssh
/usr/bin/ssh

Jenkins始终是无法执行的,后来捕捉到报错信息为sudo: sorry, you must have a tty to run sudo,后来,在网上了解到可以如下解决:
- vim /etc/sudoers
1)Defaults requiretty,修改为 #Defaults requiretty,表示不需要控制终端。
2)Defaults requiretty,修改为 Defaults:nobody !requiretty,表示仅 nobody 用户不需要控制终端。
如果修改为 Defaults:%nobody !requiretty,表示仅 nobody 组不需要控制终端。
其实只要注释掉)Defaults requiretty 那个就可以了。表示在执行的时候不打开终端。但是,有的shell必须要有终端才可以执行。这样显然是不行的。后来,又找到一片文章才搞定。下面为抄录的,仅为记录以后使用。
#最终 执行结果
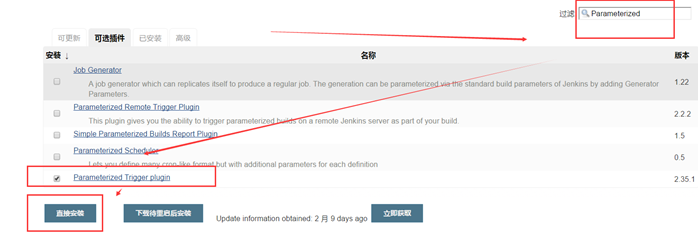
1.1 下载一个触发器
#点击插件管理 搜索 Parameterized 通过它可以通过触发器关联 多个JOB
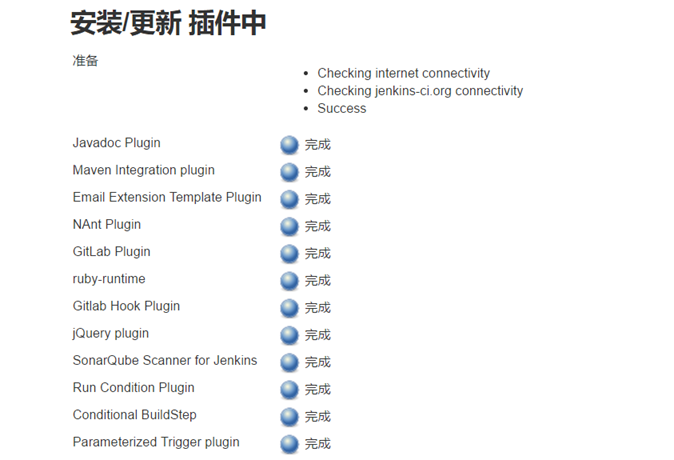
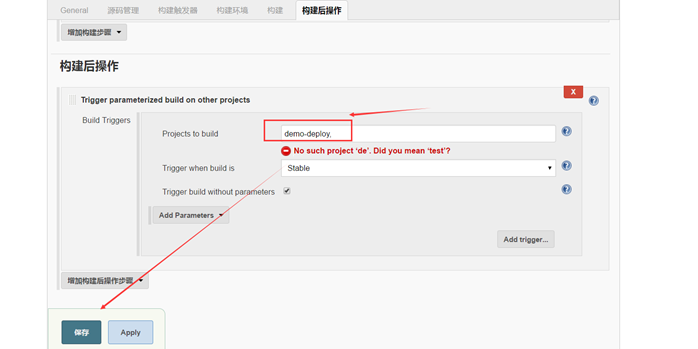
#安装完毕 需要重启 Jenkins这是可以在Jenkins web中选择增加构建后操作,Tngger parameterized build on other projects.
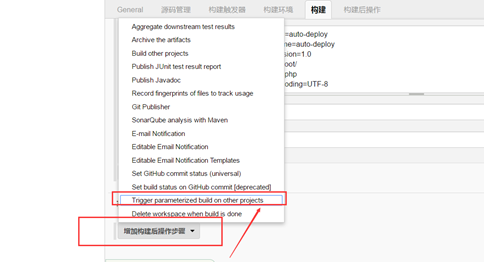
在构建后操作中选择 项目名称保存即可。(我们这里是先)
流水化插件 Build Pipeline Plugin(下载安装)
#备注:在Jenkins中每学习一个功能就是一个插件
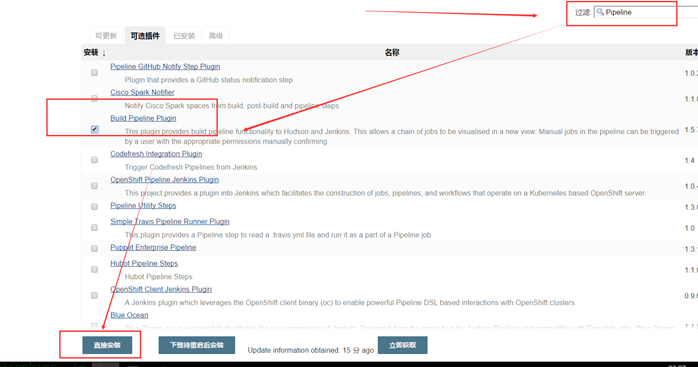
备注:如果失败上述 有两种方法,可以自己下载后再上传
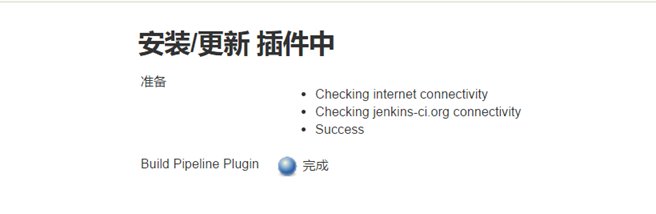
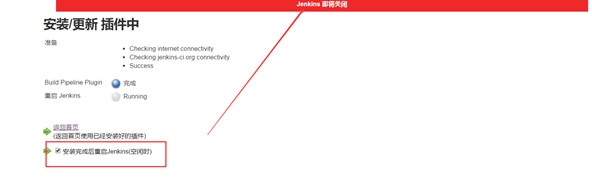
#安装完需要重启Jenkins 直接在web端重启
在Jenkins web页面
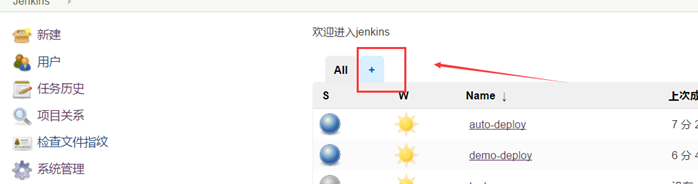
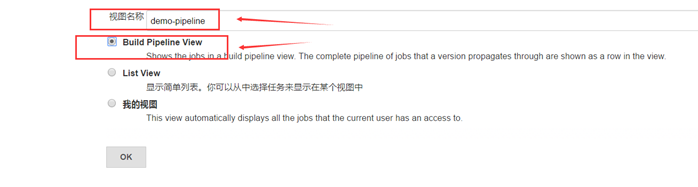
1.1 选择添加 Build Pipeline View
填写视图名称
选择 Build Pipeline View(没有没有需要安装插件)
点击OK
1.1 视图管理
选择最初的项目
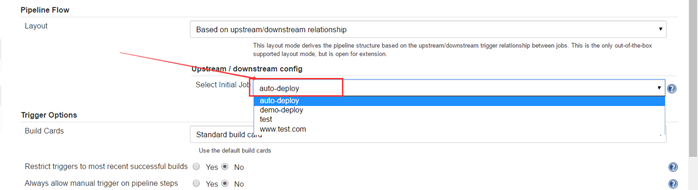
选择几次
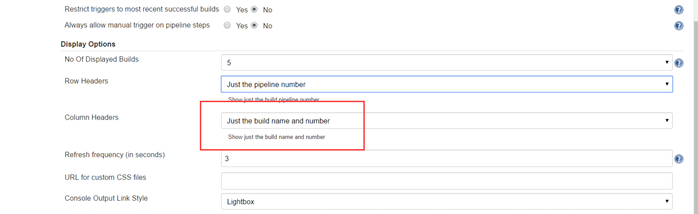
点击保存
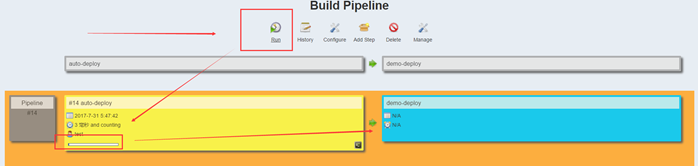
讲解:Run:点击后会运行你设置的Jenkins
History :历史记录
Configure:Build Pipeline 的配置文件
Delete:删除
Manage:返回Jenkins 主菜单
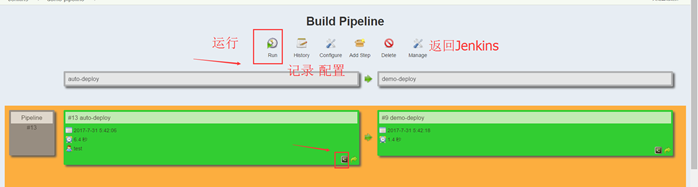
比如我执行一下