第1章 Heartbeat作用:
通过heartbeat,可以将资源(ip以及程序服务等资源)从一台已经故障的计算机快速转移到另一台正常运转的机器上继续提供服务,一般称之为高可用服务。
heartbeat和keepalived有很多相同之处,但是也有区别。
官方网址:http://www.linux-ha.org/wiki/Main_Page
1.1 工作原理:
通过修改heartbeat的配置文件,可以指定一台heartbeat服务器作为主服务器,另一台自动成为热备服务器。在热备服务器上面配置heartbeat守护程序来监听来自主服务器的心跳信息。如果在规定时间内,无法监听到心跳信息,那么就启动故障转移,取得主服务器上的相关资源的所有权,接替主服务器继续不间断的提供服务,从而达到资源以及服务高可用的目的。
heartbeat还支持主主模式,及两台服务器互为主备。一般故障切换时间在5~20s之间。
另外:和keepalived的服务一样,heartbeat高可用是服务器级别的,不是服务级别的。
- 服务器宕机
- heartbeat软件故障
- 心跳连接线故障)
服务故障不会导致切换,可以通过服务宕机把heartbeat服务停掉。
1.2 心跳连接:
至少需要两台主机才可以实现高可用服务。
两台heartbeat服务之间通信:
- 穿行电缆,所谓的串口(首先,缺点是距离不能太远 2-3米)
- 一根以太网电缆两网卡直连(常用方式,推荐)
- 以太网电缆,通过交换机等网络设备连接。(交换机可能出现问题等,容易受其他数据传输影响,导致心跳)
1.3 Heartbeat裂脑(splitbrain)
两台服务器在一定时间内,无法相互检测到对方心跳而各自启动故障转移功能,取得资源和服务的所有权,会导致同一个IP在两端同时启动服务,存在两个相同的VIP,造成冲突的严重问题。
- 裂脑的原因:
- 心跳链路故障,导致无法正常通信
- 开启了防火墙阻挡了心跳信息传输
- 心跳网卡地址等配置不正确
- 心跳方式,心跳广播冲突,软件bug
- 防止裂脑方案:
- 同时使用串行电缆和以太网电缆连接,同时使用两条心跳线
- 检测到裂脑时,强制关闭一个节点。(需要特殊设备支持,如stonish和fence)。相当于程序上的备节点发现心跳故障,发送关机指令到主节点。
- 做好监控预警
- 启用磁盘锁
- 仲裁机制(确定让那个节点接管服务)
- fence设备介绍
- IBM:RSA
- HP:ILO
- DELL:iDRAC
- 外部设备有APC生产的PowerSwitch
1.4 消息类型:
- 心跳消息(单播,广播或者多播):150字节的数据包
- 集群转换消息:ip-request,ip-request-rsp
- 重传消息:rexmit-request
1. IP地址接管和故障转移:
heartbeat通过ip地址接管和arp广播进行故障转移的。
ARP广播:在主服务器故障时,备用节点接管资源后,会立即强制更新所有客户端本地的arp表(即清楚客户端本地缓存的故障服务器的vip和mac地址的解析记录),确保客户端和新的主服务器的对话。
真实IP,又被称为管理ip,一般指配置在物理网卡上面的ip。在负载均衡高可用环境中,管理IP是不对外提供访问服务的。仅仅作为管理服务器使用,如SSH可以通过这个进行服务连接管理。
VIP是虚拟ip,实际上就是eth0:X,x为0~255的任意数字,你可以在一个网卡上面绑定多个别名。VIP当主服务器故障时,可以自动漂移到备用服务器。
注意区别辅助ip和别名ip,keepalived和heartbeat3都是用辅助ip的形式。
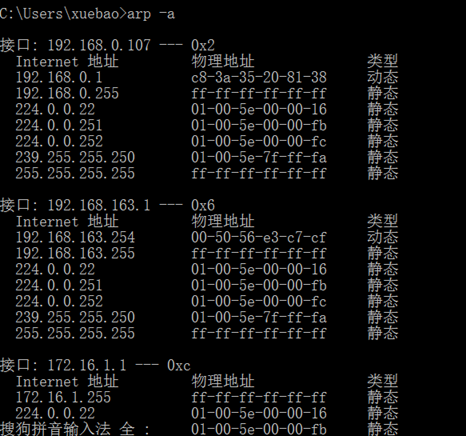
在windows中APR 查询
C:\Users\xuebao>arp -a
高可用软件的IP配置管理技术讲解
ifconfig eth0:1 172.16.1.2 netmask 255.255.255.224 up (别名IP)
提示:heartbeat2 软件默认是使用这个命令来添加VIP
ip addr add 172.16.1.1/24 broadcast 255.255.255.0 dev eth0 (辅助IP)
提示:keepalived 默认使用这个命令来添加VIP,heartbeat 3 软件采用的方案。
重要提示:ip add 命令可以查看
1.1 heartbeat 脚本默认目录
启动脚本 /etc/init.d/
资源目录 /etc/ha.d/resource.d/
1.2 heartbeat配置文件
默认文件目录/etc/ha.d
常用的有三个ha.cf、authkey、haresource

逻辑图
第1章 环境配置:
[root@linux-node1 ~]# cat /etc/issue
CentOS release 6.7 (Final)
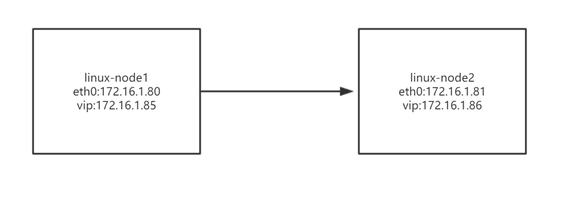
2.1 heartbeat 服务主机资源规划
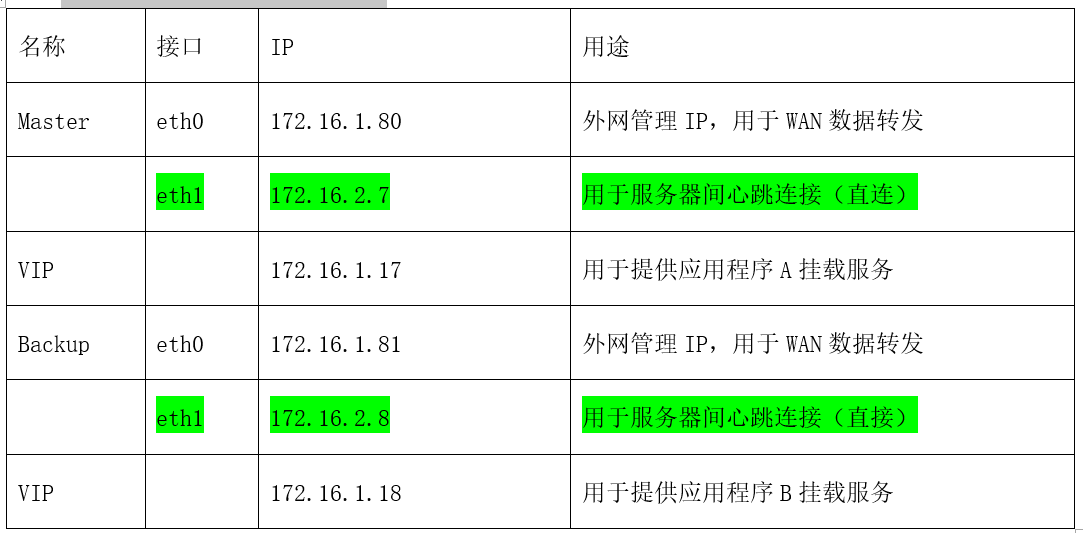
1.1 基础准备
设置一注意:
设置心跳线eth1时不要配置dns和网关
1.2 使用setup 命令设置linux-node1 eth1网卡
[root@linux-node1 ~]# setup
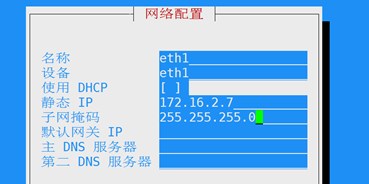
启动eth1
[root@linux-node1 ~]# ifup eth1
Determining if ip address 172.16.2.7 is already in use for device eth1...
查询 eth1
 [root@linux-node1 network-scripts]# ifconfig eth1
eth1      Link encap:Ethernet  HWaddr 00:0C:29:5E:19:4E
          inet addr:172.16.2.7  Bcast:172.16.2.255  Mask:255.255.255.0
          inet6 addr: fe80::20c:29ff:fe5e:194e/64 Scope:Link
          UP BROADCAST RUNNING MULTICAST  MTU:1500  Metric:1
          RX packets:8 errors:0 dropped:0 overruns:0 frame:0
          TX packets:12 errors:0 dropped:0 overruns:0 carrier:0
          collisions:0 txqueuelen:1000
          RX bytes:480 (480.0 b)  TX bytes:828 (828.0 b)
提示:eth1 如果启动失败查看ONBOOT=yes改成no  改成 yes
2.4 使用setup 命令设置linux-node2 eth1网卡
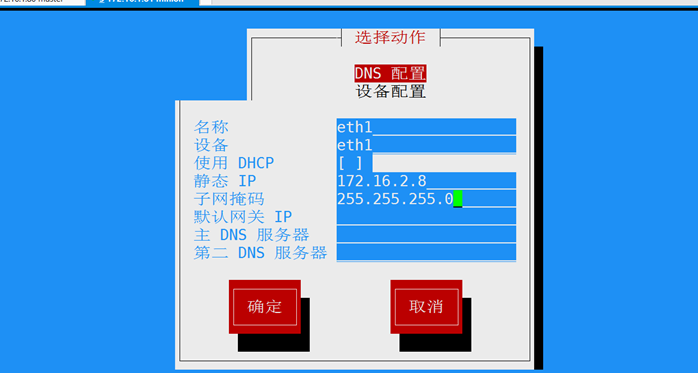
[root@linux-node2 ~]# ifup eth1
Determining if ip address 172.16.2.8 is already in use for device eth1...
[root@linux-node2 ~]# ifconfig eth1
eth1      Link encap:Ethernet  HWaddr 00:0C:29:EA:98:E6
          inet addr:172.16.2.8  Bcast:172.16.2.255  Mask:255.255.255.0
          inet6 addr: fe80::20c:29ff:feea:98e6/64 Scope:Link
          UP BROADCAST RUNNING MULTICAST  MTU:1500  Metric:1
          RX packets:0 errors:0 dropped:0 overruns:0 frame:0
          TX packets:11 errors:0 dropped:0 overruns:0 carrier:0
          collisions:0 txqueuelen:1000
          RX bytes:0 (0.0 b)  TX bytes:758 (758.0 b)
2.5.1 使用hostname 和 vim
[root@linux-node2 ~]# hostname linux-node2
[root@linux-node2 ~]# vim /etc/sysconfig/network
NETWORKING=yes
HOSTNAME=linux-node2
2.5.2 配置hosts
2.5.2.1 添加路由linux-node1
[root@linux-node1 ~]# /sbin/route add -host 172.16.2.8 dev eth1
[root@linux-node1 ~]# route -n
Kernel IP routing table
Destination     Gateway         Genmask         Flags Metric Ref    Use Iface
172.16.2.8      0.0.0.0         255.255.255.255 UH    0      0        0 eth1
172.16.2.0      0.0.0.0         255.255.255.0   U     0      0        0 eth1
172.16.1.0      0.0.0.0         255.255.255.0   U     0      0        0 eth0
169.254.0.0     0.0.0.0         255.255.0.0     U     1002   0        0 eth0
169.254.0.0     0.0.0.0         255.255.0.0     U     1003   0        0 eth1
0.0.0.0         172.16.1.2      0.0.0.0         UG    0      0        0 eth0
2.5.2.2 添加路由linux-node2
[root@linux-node2 ~]# /sbin/route add -host 172.16.2.7 dev eth1
[root@linux-node2 ~]# route -n
Kernel IP routing table
Destination     Gateway         Genmask         Flags Metric Ref    Use Iface
172.16.2.7      0.0.0.0         255.255.255.255 UH    0      0        0 eth1
172.16.2.0      0.0.0.0         255.255.255.0   U     0      0        0 eth1
172.16.1.0      0.0.0.0         255.255.255.0   U     0      0        0 eth0
169.254.0.0     0.0.0.0         255.255.0.0     U     1002   0        0 eth0
169.254.0.0     0.0.0.0         255.255.0.0     U     1003   0        0 eth1
0.0.0.0         172.16.1.2      0.0.0.0         UG    0      0        0 eth0
提示:
如果需要永久生效需要配置 静态路由或者 写到rc.local
[root@linux-node1 ~]# echo "/sbin/route add -host 172.16.2.8 dev eth1" >>/etc/rc.local
[root@linux-node1 ~]# tail -f /etc/rc.local
#!/bin/sh
#
# This script will be executed *after* all the other init scripts.
# You can put your own initialization stuff in here if you don't
# want to do the full Sys V style init stuff.
touch /var/lock/subsys/local
/sbin/route add -host 172.16.2.8 dev eth1

[root@linux-node2 ~]# echo "/sbin/route add -host 172.16.2.7 dev eth1" >>/etc/rc.local
[root@linux-node2 ~]# tail -f /etc/rc.local
#!/bin/sh
#
# This script will be executed *after* all the other init scripts.
# You can put your own initialization stuff in here if you don't
# want to do the full Sys V style init stuff.
touch /var/lock/subsys/local
/sbin/route add -host 172.16.2.7 dev eth1
目前所有准备环境都好了。
第3章 yum 安装heartbeat
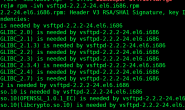
3.1 yum安装
提示:如果没有的需要安装epel 源或者 更改yum源为国内如阿里云yum ,其中centos 5 heartbeat 为2版本,centos 6 以上为heartbeat 3版本
[root@linux-node1 ~]# yum install heartbeat -y
3.2 heartbeat 配置文件目录
配置文件目录 /etc/ha.d/
[root@linux-node1 ~]# ll /etc/ha.d/
总用量 20
-rwxr-xr-x 1 root root  745 12月  3 2013 harc
drwxr-xr-x 2 root root 4096 9月  23 12:13 rc.d
-rw-r--r-- 1 root root  692 12月  3 2013 README.config
drwxr-xr-x 2 root root 4096 9月  23 12:13 resource.d
-rw-r--r-- 1 root root 2082 3月  24 2017 shellfuncs
查看 模板路径
 [root@linux-node1 ~]# ll /usr/share/doc/heartbeat-3.0.4/
总用量 144
-rw-r--r-- 1 root root  1873 12月  3 2013 apphbd.cf
-rw-r--r-- 1 root root   645 12月  3 2013 authkeys
-rw-r--r-- 1 root root  3701 12月  3 2013 AUTHORS
-rw-r--r-- 1 root root 58752 12月  3 2013 ChangeLog
-rw-r--r-- 1 root root 17989 12月  3 2013 COPYING
-rw-r--r-- 1 root root 26532 12月  3 2013 COPYING.LGPL
-rw-r--r-- 1 root root 10502 12月  3 2013 ha.cf
-rw-r--r-- 1 root root  5905 12月  3 2013 haresources
-rw-r--r-- 1 root root  2935 12月  3 2013 README
复制模板
[root@linux-node1 ~]# cd /usr/share/doc/heartbeat-3.0.4/
[root@linux-node1 heartbeat-3.0.4]# cp ha.cf haresources authkeys /etc/ha.d/
3.2.1 ha.cf 文件详细说明


修改配置文件。
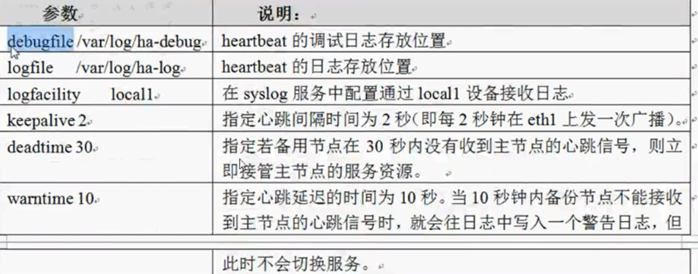
[root@linux-node1 ha.d]# vim cat ha.cf
debugfile /var/log/ha-debug
# 用于记录heartbeat的调试信息
logfile /var/log/ha-log
# 用于记录heartbeat的日志信息
logfacility local1

keepalive 2
# 设置心跳间隔
deadtime 30
# 在30秒后宣布节点死亡
warntime 10
# 在日志中发出“late heartbeat“警告之前等待的时间,单位为秒
initdead 60
# 网络启动时间
mcast eth1 225.0.0.80 694 1 0
# 使用网卡heartbeat,并在eth1 接口上使用广播heartbeat
auto_failback on
# 当主节点从故障中恢复时,将不会自动切换到主节点
node linux-node1
node linux-node2
# 集群中机器的主机名,与“uname –n”的输出相同。
crm  no

3.2.2 authkey 设置
authkey 授权 600 (否则启动不了)
设置认证方法sha1,默认选择使用crc方法,这是不加密的,不够安全。
[root@linux-node1 ha.d]# vim authkeys
auth 1
1 sha1 47e9336850f1db6fa58bc470bc9b7810eb397f04
修改完授权600
[root@linux-node1 ha.d]# chmod 600 /etc/ha.d/authkeys
3.3 haresources 设置
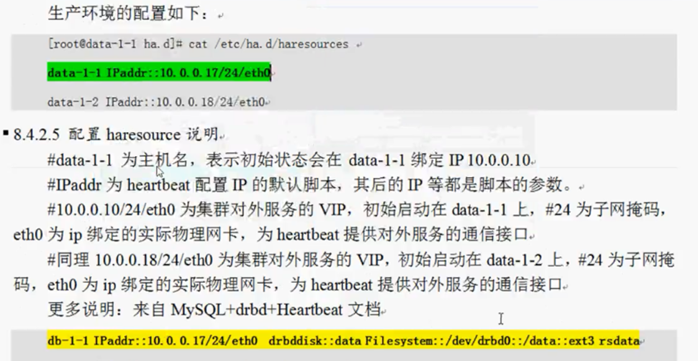
[root@linux-node1 ha.d]# cat haresources
linux-node1 IPaddr::172.16.1.17/24/eth0
linux-node2 IPaddr::172.16.1.18/24/eth0
# 提示前面是自己的主机名 并两台主机 一样的配置 linux-node2 不在进行操作。
3.4 启动heartbeat 两台都操作
[root@linux-node1 ha.d]# /etc/init.d/heartbeat start
Starting High-Availability services: INFO:  Resource is stopped
INFO:  Resource is stopped
Done.
[root@linux-node1 ha.d]# ip add|grep 172.
    inet 172.16.1.80/24 brd 172.16.1.255 scope global eth0
    inet 172.16.1.18/24 brd 172.16.1.255 scope global secondary eth0
    inet 172.16.1.17/24 brd 172.16.1.255 scope global secondary eth0
3.5 heartbeat 实现web服务高可用案例:
双台主机都安装apache
3.5.1 linux-node1 设置
[root@linux-node1 ha.d]# yum install -y httpd
启动
[root@linux-node1 ha.d]# /etc/init.d/httpd start
修改apache index文件
[root@linux-node1 html]# cd /var/www/html/
[root@linux-node1 html]# ls
 [root@linux-node1 html]# echo 1.80>index.html
3.5.2 linux-node2 设置
[root@linux-node2 ha.d]# yum install -y httpd
启动
[root@linux-node2 ha.d]# /etc/init.d/httpd start
修改apache index文件
[root@linux-node2 ha.d]# cd /var/www/html/
[root@linux-node2 html]#  echo 1.81>index.html
[root@linux-node2 html]# ls
index.html
3.5.3 访问网址测试
提示一定要访问自己的VIP如果我们只看172.16.1.17
http://172.16.1.17/
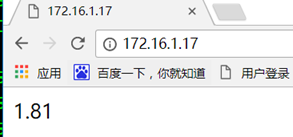
通过命令查询发现172.16.1.17 在linux-node2 主机上,因为linux-node1 heartbeat 停止中。

开启 linux-node1 的heartbeat
ip add 查询172.16.1.72 已经回到80主机

http://172.16.1.17/
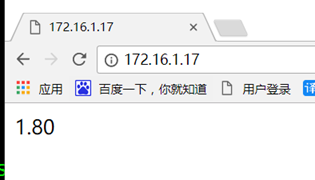
测试 heartbeat 172.16.1.17 VIP 切换成功。